Thursday, September 28, 2023

News...

 I published my first post on this blog in October 2020. For more than a year, I regularly posed diverse and varied subjects. During this period, I noticed that this blog did not interest many people. So to speak, no one.

Without even realizing it, I quite naturally ended up stopping my publications focused more specifically on computing and retro computing on this blog, favoring my other more general blog https://synthelectro-fr.blogspot.com.

A little by chance, I was able to observe recently that the consultations of this blog had greatly increased, despite the fact that I have not published anything new for over a year now.


This motivates me again to revitalize this blog. Especially since during February 2022 (last post on this blog), I studied several projects based on RISC-V processors.

Yes, because until then, I often used ARM processors from STMicroelectronics. But I admit to having difficulty, not with these processors, but quite simply with the graphical resource configuration interface, STM32CubeIDE. I know, this type of software is supposed to greatly facilitate the start of any project, but I find that this approach is a little too 'virtual'.

After all, I'm a guy from the 80s where absolutely everything had to be done 'by hand'. I kept this 'root' approach and I think that this makes it easier to 'become aware' of the operation of the processor used.

I came across the RISC-V processors from Nanjing Qinheng Microelectronics Co. 'fortuitously' and in particular their WinChipHead (WCH) brand.

So I now use the CH32V203 & CH32V307 range of processors.


So, since the beginning of 2022, I have started to migrate my projects to this new series of processors. One of the first examples concerns a 4-channel TIMER, easy to use, intended to be the worthy heir of the famous TMS1122 processor from TI. with some improvements, obviously.

I used this project to really discover WCH processors, and also to implement a concept that I appreciate and that I discovered on Facebook, the minimalist computing.

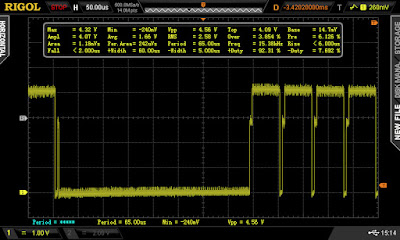
My Timer publication on the 'Minimalist Computing' group :


I am therefore thinking of publishing now on this blog the progress of my projects based on RISC-V processors.


Monday, February 28, 2022

ZX81 finally at home ;-)

After doing some research on the popular modifications to be made on a ZX81, I decided to modify the video output in order to provide a composite video signal directly usable on a monitor with this type of input.

Also, rather than increasing the RAM size to the usual 2KBytes, I decided to implement a 16Kbytes extension.

As a reminder, the keyboard connectors are cut. So I ordered a new membrane keyboard (see previous post). Moreover, after checking the video signal at the output of the PLA (pin 16), I know that the video signal is correctly generated :


In fact, after looking more closely at the video output, I could see that the cursor was indeed displayed. I was able to see 8 successive lines with this type of signal:


So, I decided to set up inside the HF modulator, a small circuit intended to improve the quality of the composite video signal, in particular to solve the problem of the back porch.


This type of circuit (ZX8-CCB) is available at this address

It is also possible to mount yourself a small transistor-based assembly which will have roughly the same effect, except that the back porch is not treated, which can be a problem on some monitors : 


Good, information about how the ZX8-CCB circuit works can be found there.

So here is what the modification of the HF modulator looks like after inserting the circuit  ZX8-CCB:


As I said at the beginning of the post, I also took the opportunity to increase the internal RAM to 16Kbytes. There is enough information on this subject on the web that it is not useful here to describe the implementation process. I used 16KBytes of a 32KBytes static RAM :


Voilà, once these modifications have been made, it remains to carry out the first operational tests.


And the tests to verify that the 16Kbytes are present :


So let's go :


And the result:


Conclusion: These small modifications require a bit of time but do not present any difficulty. With a working ZX81, these modifications allow a very interesting update of the machine for a very modest price.

Also, I didn't use a new membrane keyboard. I just trimmed the original connectors a few millimeters to remove the damaged part. It works perfectly.

Note that I have never been able to obtain an image with the RetroTink 2X Mini converter that I own.


The images shown here are from a ViewSonic brand monitor.

Finally, here I am, the owner of a fully functional ZX81. A computer that I first touched (in the literal sense) in 1983. I will always remember it as a very intense moment. I never bought one, however I was able to do a few programs on it at school the following year. As it was impossible for me to have access to a television set in my bedroom as a teenager, I fairly quickly bought a Sharp PC1500 which had its integrated display and which I had a lot of fun with.

sweet home ;-)


Tuesday, February 8, 2022

New arrival : ZX81

Why a ZX81 and not another computer will you tell me. Well, because it was the first computer I held in my hands. It was in 1983, I discovered microcomputing in magazines and had never seen it for real.

In my memories, it was in the summer of 1983, I was on vacation with my parents and, in a lost town in Burgundy, Montceau-Les-Mines, when I entered a small electronics shop to try to buy a TMS1122, I saw a working ZX81 displayed on a shelf. It was a real emotion for me to hold in my hands this little thing that everyone was talking about.

This is how I received my vaccine not Omicron, but 'Oh-Micro'! Since that date, I have never owned a ZX81. As we are now in 2022, I wanted to finally have a copy before the 40th anniversary of this meeting in Burgundy!

And here is MY ZX81, in superb condition:


The question is, does it work? I don't have any adapter to connect this ZX to a current screen. At first, I therefore contented myself with dismantling it to check whether it showed signs of intervention.

So I disassembled the machine:

At this point, I tested the power supply. The 5V is present and the integrated circuits heat up in a 'normal' way. I also checked the temperature of the Ferranti ULA circuit which is reputed to heat up enormously. After about ten minutes of operation, I obtain a temperature of 70°C, which indeed is a little hot, but not excessive.


The 5V regulator also heats up but in a reasonable way. These first observations lead me to think that the machine 'must' function normally.


After meticulous examination of the electronic board, I nevertheless noted that some weldings were carried out around the capacitor of the power supply:


We can clearly see the traces of soldering also on this side of the printed circuit. The power supply onnector has even been slightly melted with the soldering iron:


In order to get a more precise idea of the operating condition of this ZX, I simply examined the video signal at the output of the Ferranti circuit. It's pretty easy to do, just probe the track near the TV modulator:


On the following picture we can clearly see the horizontal synchronization signal:


And now with the vertical sync signal:


So all of this seems to match what I've been able to find on the internet about the ZX81's video output:

trastero.speccy.org

But then, what could be the problem with this ZX? Because it must have one since it was dismantled in the past. So I don't know if that's it, but the flexible circuit board connecting the keyboard is obviously cut:


It is a great classic of the ZX81. I don't know yet what I'm going to do. I know it's extremely risky to attempt a repair with a soldering iron. In fact, it never works. As the plastic is cut, it is also not possible to repair the tracks with conductive paint. The best would be to replace this keyboard. I have seen announcements in the past about new keyboards being available. I'll look there.

Not available at this time but...


And then, what would be interesting, would be to connect this small machine to a small LCD or VGA screen. And precisely, I found a small project on GitHub that could be suitable:


The project can be found here: https://github.com/holmatic/zx-iot-video.

Last but not last, the ZX81 was an English computer, as well as the 6502-based BBC machines made by Acorn, as well as the line of Acorn-specific computers with RISC ARM processors that power Raspberry boards today: history of English computing continues...


Friday, November 12, 2021

MSX Omega computer : 'Hello world" with the new USB keyboard interface.

The goal of my project is to develop an interface card to connect a keyboard directly to the MSX Omega main board. 

The MSX Omega processor board equiped with the USB keyboard adaptor :


A few days ago, I managed without too much difficulty to simulate a basic operation of the USB adapter allowing me to display characters on the screen.

However, it took me a few hours of additional testing to finalize a reliable mode of operation, including automatic key repeat as well as some modes of operation with the SHIFT key. 

I haven't implemented all the secondary keys yet, but in the current state, I was finally able to program my first "Hello World" :

OK, this tiny step is not going to change the face of the world, but just give me a little satisfaction ;-)

Everything always needs a start!


Friday, November 5, 2021

Keyboard for OMEGA MSX Computer : it works!

It took me much less time than expected to be able to interact with the OMEGA board:

Before testing my USB to keyboard adapter board, I had tested the reception of codes from the USB keyboard. So I knew it was working. But I still didn't know how MSX BIOS scans the matrix keyboard.

After a few attempts and oscilloscope tests, I was able to send 'things' to OMEGA. But obviously not the right codes. After having researched the official codes of the MSX keyboards, I realized that the BIOS installed on OMEGA manages the Japanese keyboard! Why not!...

My first goal being to be able to type a little Basic program and run it, I decided to code the essential characters. First, the alphabet:


I am totally amazed at how easy it was to turn on my USB / OMEGA keyboard interface. I didn't have any issues with the design of the board, everything worked right from the start. Coding the software of the small STM32G0 processor was really very easy with the STmicro IDE.

For now, the coding is more of the quick and dirty type but it works very well!

On the way to my first "Hello World" program ;-)


Wednesday, November 3, 2021

Keyboard for OMEGA MSX Computer : no 'magic' smoke :-)

Until now, I have carried out my developments on this USB keyboard interface by powering the board using a laboratory power supply. As I have pretty much finished the software embedded in the STM32 processor, it's time to see what it looks like on the OMEGA board.

This is what the final assembly looks like:


The interface LED responds well to pressing keys on the USB keyboard. It remains to be seen if this works well with the OMEGA board.

As a USB keyboard does not really take the specific keys of the MSX keyboard, I planned the use of specific keys of the USB keyboard like ALT, CTRL etc ...


Friday, September 24, 2021

A better keyboard for the µPF--2

After having imagined several solutions to obtain an acceptable keyboard for the µPF - 2, I ended up using key caps which it is possible to label:


For the moment I have not printed the labels of the keys in color, it would have been nicer, but the result is quite practical. This keyboard has nothing to do with what the original kit offers : https://www.kswichit.com/Z80/Z80.html.